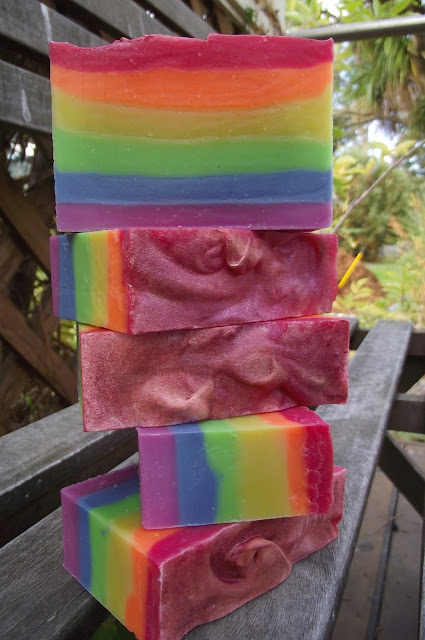
Who doesn't love a rainbow? This recipe uses 1000 grams of oils and fits this loaf mould rather nicely. I cut it into 8 slices about 3cm thick.
Recipe:
450g olive oil330g sustainable palm oil
220g coconut oil
330g de-mineralised water
143g sodium hydroxide
Non-accelerating fragrance oil or essential oil - I used 40g of Brambleberry's Energy fragrance oil.
Remember when using essential oils not to use more than 3.5% of the total weight of oils in your soap. The total oils in this recipe is 1000g so only use up to 35g essential oil.
I used these colours from Aussie Soap Supplies:
Please note, for the blue on the very top photo on this page, and the photo at the very bottom, I used this ultramarine blue powder instead of the deep blue liquid pigment.
This is what I did:
WARNING: If this is your first cold process soap you need to learn the basics first as I won't be explaining them in this tutorial. Here are two videos on how to make cold process soap by the Soap Queen you should watch first - Lye Safety & Ingredients and Basic Terms. It is important that safety procedures be strictly followed as sodium hydroxide can cause serious injury and death if not used properly.
- Dissolve sodium hydroxide in the water - remember to add the chemical to the water, not the other way around.
- Warm the oils in a saucepan or in the microwave on medium heat. Once all the oils are completely dissolved, transfer the mixture to the container you wish to mix your batter in. A two litre pyrex jug with a spout works well. Stainless steel and heavy duty plastic can also be used. Some soapers use the saucepan they warmed their oils in, but make sure it is stainless steel and not aluminium as sodium hydroxide reacts with aluminium.
- I like both my mixtures (lye and oils) to be around 35-40 degrees celcius, but some soapers prefer it cooler. After some experience all soapers work out their own preferences.
- Add lye to oils and blend to emulsion with a stick blender. (Emulsion is where everything is well mixed but hasn't started to thicken up).
- Divide the mixture between 6 plastic jugs - there will be approximately 250 ml (1 cup) of soap batter per jug. I use these measuring jugs from Brambleberry. This part can be very messy - I use paper towel to protect the bench top.
Now it gets tricky! You're working with 6 different colours, a fragrance oil (some of which accelerate trace and others that can even thin it), you don't want to contaminate the colours too much with each other, and you want each jug of batter to thicken up at different times so you can layer them one by one into the mould.
I won't pretend it's easy, and I did have some problems, but this is what I did:
- Weigh out your fragrance oil and have it ready.
- Have two stick blenders on hand if possible.
- Start with the first colour to be layered in the bottom of the mould - Magenta Violet. I admit I did not measure out my colours, I prefer sometimes to add colour until it looks right then hope for the best. Squirt some into one jug of batter and whisk with a wire whisk, adding more colour if needed. You may need to use the blender if the colour isn't mixing well or the batter isn't thickening at all.
- When you're satisfied with the colour pour approximately 1/6 of the fragrance oil in (there is no need to be precise here.) Whisk.
- Before you pour this into the mould you want it to be thick enough to be able to pour another colour on top of it without it breaking through. A thick custard-like consistency is good. If the batter doesn't thicken up by whisking, then use the stick blender to help it along. You need to be working quickly as the batter in the other jugs will start to thicken up too much if left too long.
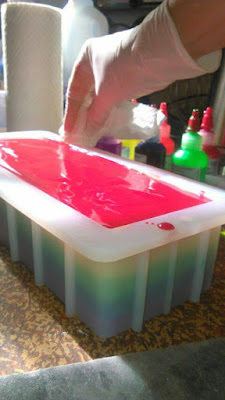
- Pour the purple batter evenly into the mould and thump the mould down on the bench top a few times to get rid of any air bubbles.
- Now follow the same procedure for the blue layer. When the batter is thick enough, pour it over the purple using the back of a spatula to ensure it sits on top of the purple layer without breaking through. Give the mould a bit of a thump.
- Continue with this procedure for each of the colours in this order - after the blue then green, yellow, orange and red on the top. You may want to use a second clean blender once you get to the lighter colours to avoid the colours contaminating each other. Alternatively a quick wipe with some paper towel between colours may suffice but TURN THE POWER OFF FIRST!
- Sometimes (okay, many times!) things don't go according to plan. I over-blended my soap batter initially and it started to thicken up too fast. By the time I got to the orange it was very hard to pour and I was plopping it on top and trying to spread it out to the edges of the mould. This kind of thing doesn't bother me because I'm a great believer in the beauty of the imperfections of a hand made product. I know my rainbow soap is not going to look "perfect".


- Clean up the sides of the mould with some paper towel and spritz the top of the soap with isopropyl alcohol. The alcohol helps to prevent soda ash.
- I cover the mould with a cardboard box, then cover the box with a blanket, which helps the soap to go into gel phase. This is optional, but I do like the way the colours "pop" or stand out after going through gel.
- The soap (if gelled) should be ready to unmould after 24 to 48 hours. Then it should be sliced and cured for about 6 weeks.
- Once un-moulded I chose to brush the top of my soap with red mica to give it a bit of sparkle.


